It's the Spring of 2020, and the world has been put on lockdown, and neither Ironman nor
Wonder woman turned up to save us all, which I think makes all those Marvel and DC
documentaries misleading.
Well.. what am I to do now I'm furloughed for an unknown period of time??
I decided to put the time to good use, and get stuck in with some light-hearted coding
and
electronics projects.
Hopefully some of them make you smile, and others may inspire you to flex your creative
muscles and build your own amazing projects!
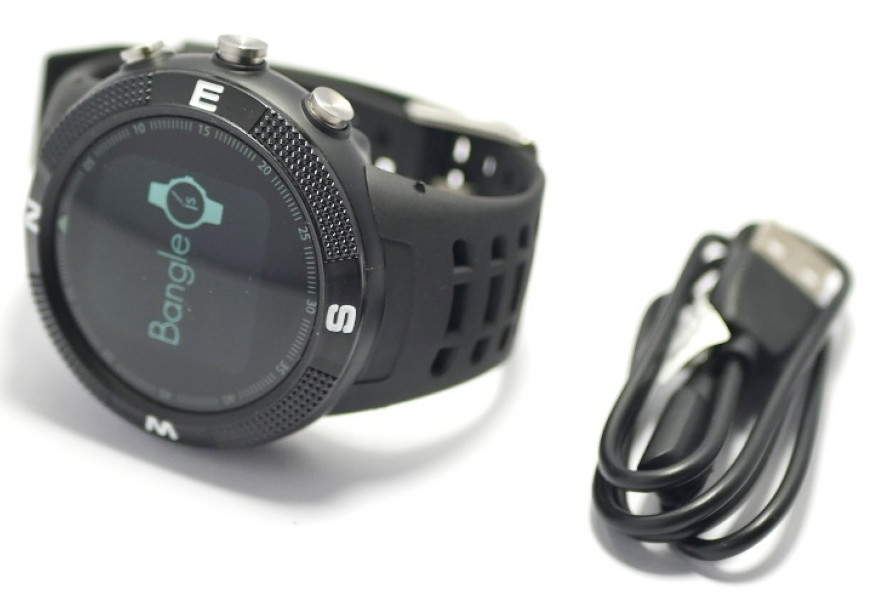
BangleJS
Introducing BangleJS
You may or may not have heard about the brilliant opensource smart watch from
Espruino
called the
Bangle.js. I was
a backer of the kickstarter
campaign
and received mine just as the lock down kicked in .
It's a fantastic watch that is exreemely easy to develop apps for. You write your apps
in Javascript, directly in the browser, and load into the watch
wirelessly over bluetooth.
That's right, it is SUPER EASY!.
If you would like to purchase one, head on over to the Espruino shop
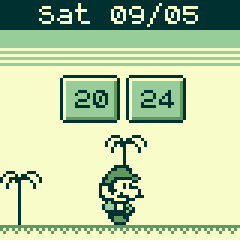
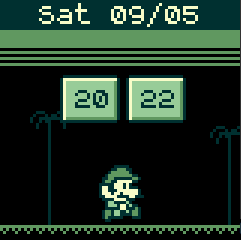
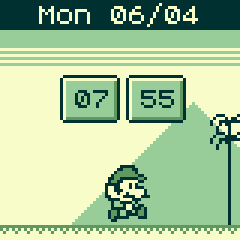
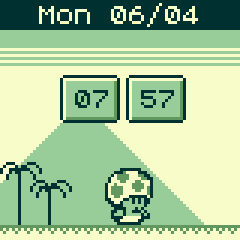
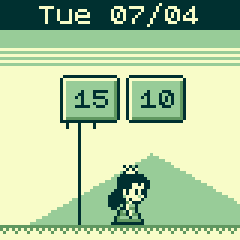
The first project I created was a Gameboy inspired Mario watchface. As this is a watch,
it seemed like the best place to begin, and I always wanted to design
and create my own digital clock. This was inspired by an old
microcontroller
project I did a few years back, which itself was inspired by a Mario watchface I
had on my Pebble watch.
In a nutshell it is an animated watchface, where Mario is running through a level with
random scenery, and when the time increments every minute, he jumps and hits the blocks
that show the time.
This watchface is packed full of features, and I think the end result is quite splendid!
Day/night mode
We are all aware of the strain we put our eyes under with bright screens at night, so a
dark mode was a must. It has three levels of darkness which
are cycled through by swiping left.
Multiple characters
Mario is great, but we also love Toad and Daisy, so we have them all! To cycle through
the characters you swipe the screen right. What ever is you choose is saved, so if you
navigate to another app and return to this default watchface, your character will be
selected automatically.
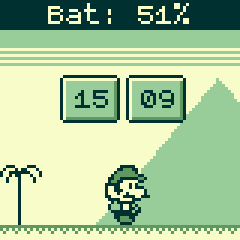
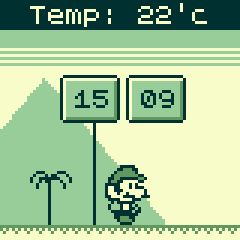
Information panel
The screen is configured to use its lowest resolution - 80x80. This does not leave us
with much space to display different information. So I implemented an information panel
at the top of the watchface. This panel can show multiple peices of information by
pressing button-1 on the watch, which cycles through the following:
Date
Battery level
Temperature
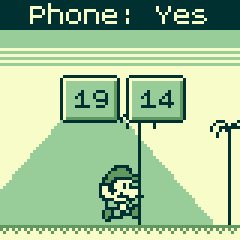
Phone connectivity (more on this later!)
Mobile phone connectivity
This works with Android only, through a mobile app called Gadget
Bridge.
It allows messages to be passed between the mobile phone and the watch over bluetooth.
This watch face will let you know when you get a text or a phone call, it scrolls the
caller/sender and message/phone
number on the information panel, while the character has a speech bubble with an icon
showing the communication type, and the watch will buzz for a few seconds.
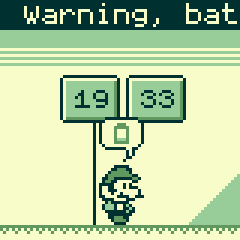
Low battery
If the watch battery drops bellow 10% the watch will show a message on the information
pannel and the character shows a battery icon in a speech bubble. The watch will vibrate
to make sure you get the message. It will repeat every ten minutes until it dies or you
plug in the charger.
View information about the Sun and Moon, such as position in the sky, rise & set times
and much more based
on your GPS position and date.
This little app is good fun if you like to know the times and technical terms and phases
the Sun and Moon go through, for the present day. Such as the current moon phase, the
position of the Sun and moon in respect to the earth and so on.
The maths that drives this came from the Suncalc library that was slightly modified
to run on the BangleJS (and some issues corrected). I am in no way clever enough for
this sort of maths, what I really did was add a nice watch-friendly
display over the top of it.
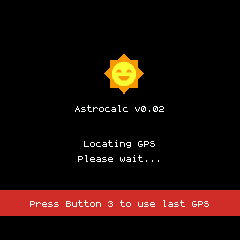
When it boots it reads your GPS position (or you can skip this if you have a previous
GPS lock), and then presents a menu for you
to navigate through to learn about the Sun and Moons details for today.
Splash screen
Waits for the watch to get a GPS lock, or if you have previously had a GPS lock it will
offer you the option to use that.
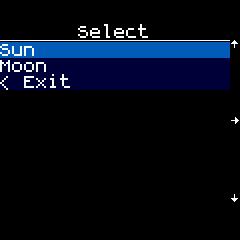
Main menu
Gives you the options to view information on either the Sun or the Moon.
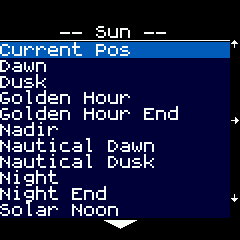
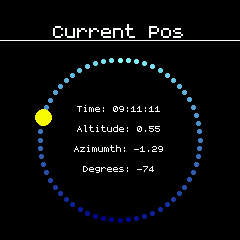
Sun
You are presented with a menu for all the details you can learn about for the Sun, for
your location and today. On selecting an option you get a graphic showing the Suns
position around the earth, where the top of the circle is noon.
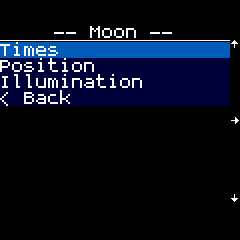
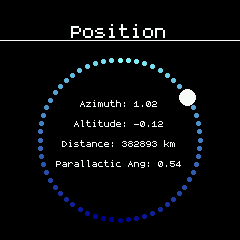
Moon
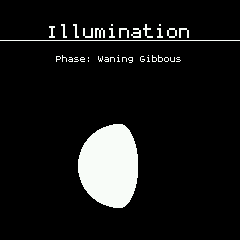
You are presented with a menu for all the details you can learn about for the Moon, for
your location and today. On selecting an option you get a graphic showing the Moon
position around the earth, where the top of the circle is noon. And also the current
phase the Moon is in.
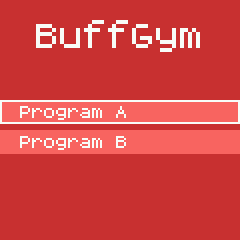
You will want to set your own starting weight values for your 5x5 training program. To
do this is easy! After installing this app, go to the BangleJS app store, connect to
your watch, and navigate to the My Apps tab. In there you will find this
app in the list, and an icon (a down arrow) to the right of the app title. Click that
icon to reveal a configuration page. Enter your weights and other details, and click
upload. That is it, you are now ready to train!
Usage
Start screen
When you start the app it will wait on a splash screen until you are ready to start the
work out. Press any of the buttons to start.
Workouts menu
You are then presented with the workouts menu, use BTN1 to move up the list, and BTN3 to
move down the list. Once you have made your selection, press BTN2 to select the workout.
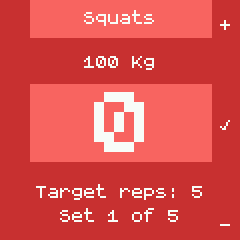
Recording your training
You will now begin moving through the exercises in the workout. You will see the
exercise information on the display.
At the top is the exercise name, e.g 'Squats'
Next is the weight you must train
In the center is where you record the number of reps you completed (more on
that shortly)
Below the reps value, is the target reps you must try to reach.
Below the target reps is the current set you are training, out of the total sets for
the exercise.
The reps value is used to store what you achieved for the current set, you
enter this after you have trained on your current set. To alter this value, use BTN1
to increase the value (it will stop at the maximum required reps) and BTN3 to
decrease the value to a minimum of 0 (this is the default value). Pressing BTN2 will
confirm your reps
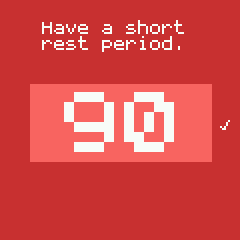
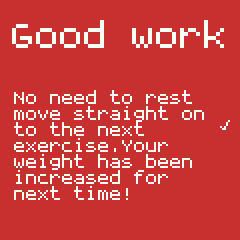
Rest timers
You will then be presented with a rest timer screen, it counts down and automatically
moves to the next exercise when it reaches 0. You can cancel the timer early if you wish
by pressing BTN2. If it is the last set of an exercise, you don't need to rest, so
it lets you know you have completed all the sets in the exercise and can start the next
exercise.
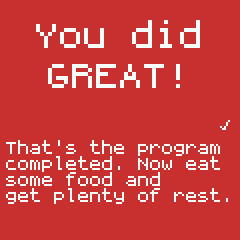
Workout completed
Once all exercises are done, you are presented with a pat-on-the-back screen to tell you
how awesome you are.
Features
If you successfully complete all reps and sets for an exercise, it will
automatically update your weights for next time
Has a neat rest timer to make sure you are training optimally
Doesn't require a mobile phone, most 'smart watches' are just a visual
presentation of the mobile phone app, this runs purely on the watch. So why not
leave your phone and its distractions out of the gym!
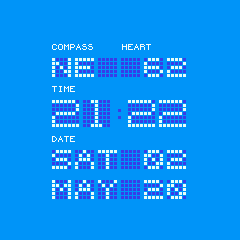
A clock face simulating the classic dotmatrix displays. Shows time, date, compass, and
heart rate.
This is a basic watchface with nothing too fancy going on. I just like bulky graphics I
suppose, and wanted to produce a simple static display that was pleasing to the eye.
It emulates the lovely white-on-blue LCD displays.
This is still under development at the time of writing.
IOT
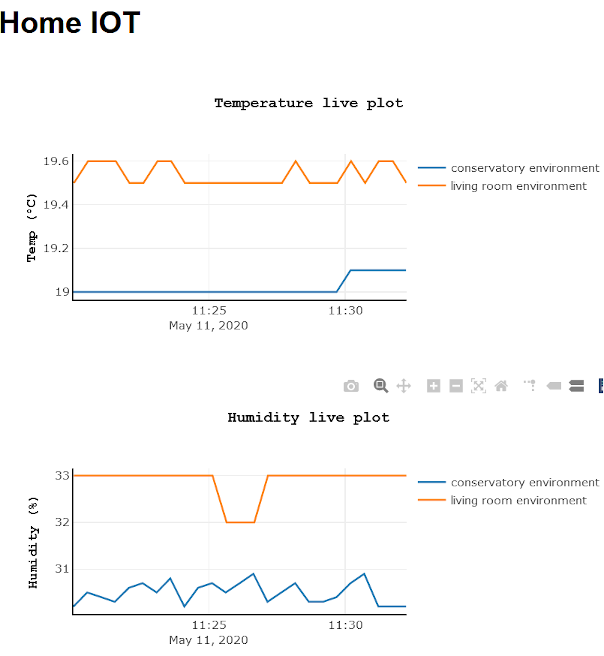
Home IOT with Arduino
Home IOT project using Arduinos to record environmental readings
Project summary
This was more of a spike to see what I can do with the electronics components I had
lying around in various boxes.
I wanted to see if I could set up some sort of simple wireless environmental sensor
network and have the data consumed and published up to Google IOT services for storage
and presentation.
I searched the internet for tutorials doing this sort of thing, and after combining them
together I ended up with this functioning project.
Hardware
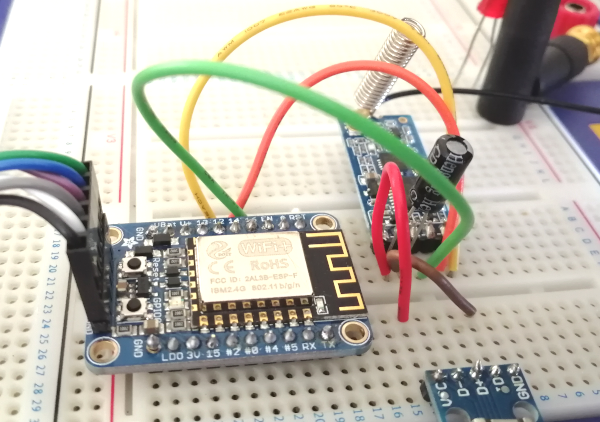
I found the impressive esp8266 wireless module and a few Arduino Nanos, some HC12
transceivers and a couple DHT11/22 sensors. This appeared to be all I needed to get the
project started.
So to begin with I needed a 'hub' to which all the remote wireless sensors would
transmit the sensor data to, and in turn was connected to the internet.
This was ideal for the esp8266 module, to which I connected a HC12 transceiver.
Cloud setup
The next step was to write some code that connected the device to my home wireless
network and authenticate with Google IOT. This required all the necessary provisioning
of services on Google Cloud, such as:
IOT Core
MQTT Pub/Sub
Construction
Now that the esp8266 was on the network and authenticated and communicating with Google
IOT services it was time to make the remote sensors. These were simple to set up, just
connect an Arduino Nano to a DHT11 sensor (which collects temperature and humidity) and
the HC12 wireless module.
It is important that all the HC12 modules are operating on the same channel, baud rate
etc. I chose configuration 'FU4' which is for long range comms, these settings are
configured using AT commands through a serial connection.
With the sensors transmitting data, and the hub device collecting and publishing them to
the message queue on Google, it was time to process, store and render the data!
Arduino Nano + DHT11 + HC12 sensor transmitter
Huzzah ESP8266 + HC12 receiver 'hub'
Cloud processing, storage and presentation
I used Googles Firebase for this step. In here I created a serverless-function to
process the messages that come in on the message queue, and persist them to the
real-time database I set up.
With the messages persisted, I then put together a simple webpage (hosted in Firebase)
to render a section of the latest data in graphs.
Conclusion
This was a nice little project, that had its learning curves I'll be honest, especially
when it comes to the HC12's.. they can be very fussy in their physical setup to get
working, such as aerials types, aerial position and orientation, distance etc.
There are plenty of tutorials on doing projects just like this, I usually head over to
Instructables which has many great projects for you to follow.
Sacred Geometry
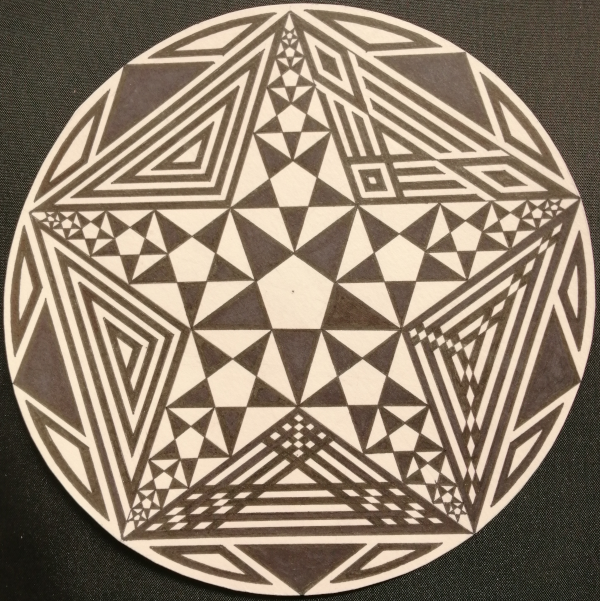
Investigating Sacred Geometry for relaxation
Sacred Geometry is really fascinating, and the pictures you produce are exceptional.
After doing a lot of coding after the first four weeks of lockdown, I needed to take a
break and decompress. I was working more hours than I would at work, and also working
seven days a week.. It was hard to stop I was enjoying it all so much.
But still I decided to relax with some drawing, in particular some Sacred Geometry. It
is very therapeutic, as all you need is a compass, ruler, and a pen. No artistic skills
need for this!
What makes this way of drawing special is that the pictures are mathematically perfect,
everything is a ratio of something else you draw before-hand. You can only create
distances by existing line intersections. You have to watch a video of one being drawn
to understand what I mean.
I found this fantastic channel on Youtube by Dearing Wang that is full of timelapse videos of the art being
drawn, that you can follow along to.
Completed drawing
It took three days, dipping in and out of the drawing. And I also did some of my own
patterns as part of experimentation.
Farsi
Learning the Farsi (Persian) alphabet
I am left handed, and there are only a couple languages in the world that have a script
that is written from right to left.
This is intruinging to me and wanted to see if it felt more natural to write this way
(my assumption was yes).
So I picked Farsi (Persian) which is an Indo-European language, which means it has all
the familiar sounds like in English,
but it uses a variant of the Arabic script, which is written from right to left, and
exceptionally beautiful.
I completed the book and I have to say it is fantastic, I have many other books but I
get lost in the gramar and unfamiliar script and words.
This just teaches you the alphabet and gives you the ability read words (even if you
don't know their translation). It is a great place to start.
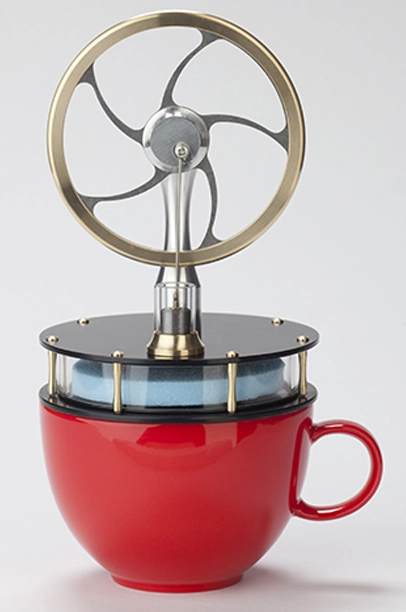
Thermal motor
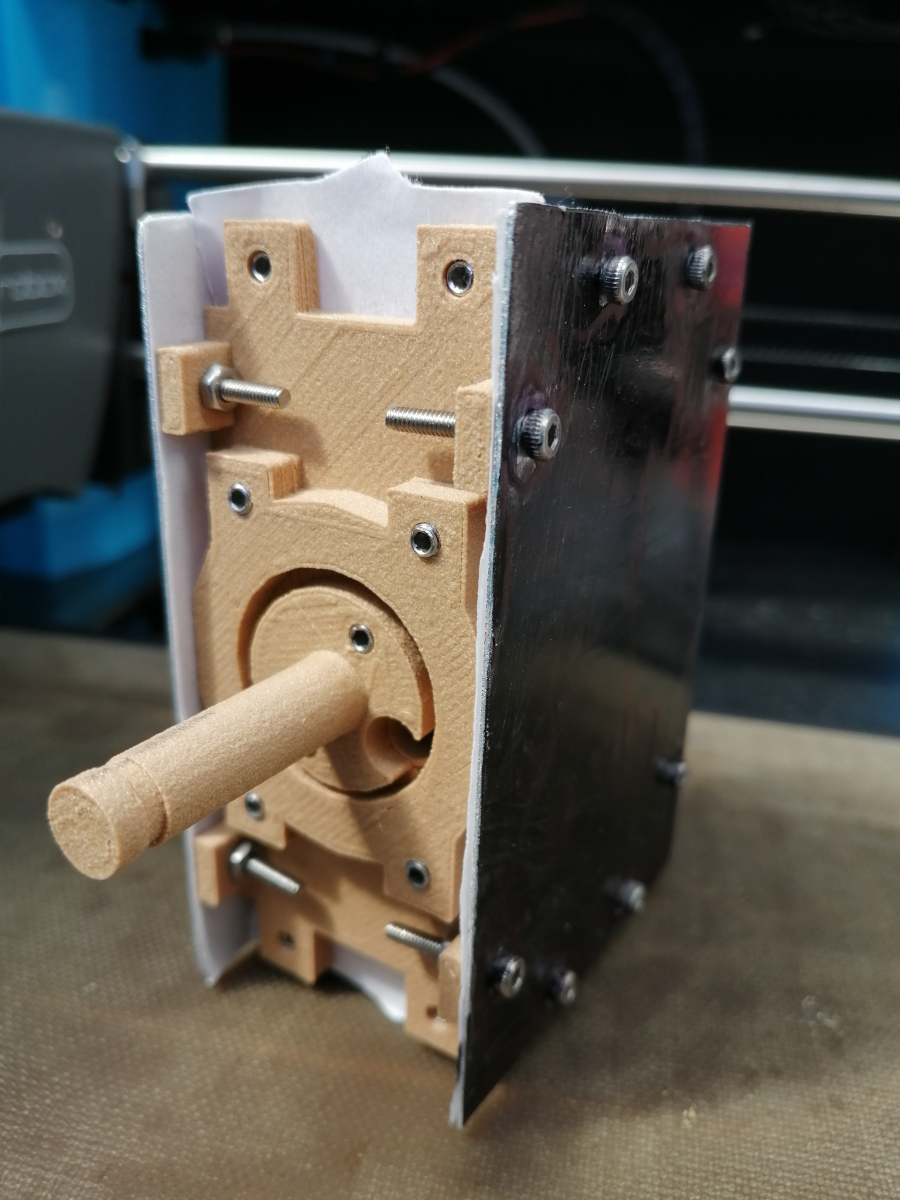
Reinventing the Stirling engine
I have loved the concept of the Stirling engine since before I even had a beard. You may
have come accross one before, the classic images is to have one run on the difference
between the ambient temperature and the heat from a cup of tea.
I love the idea of these engines, and think they deserve much more investigation as a
potential way of converting the energy the sun hurls at us into mechanical energy.
What I dislike about them is they are very bulky with wheels and rods etc, which I guess
doesn't make them very practical in real life. So I went on to design a more compact
implementation, more like an electric motor configuration.
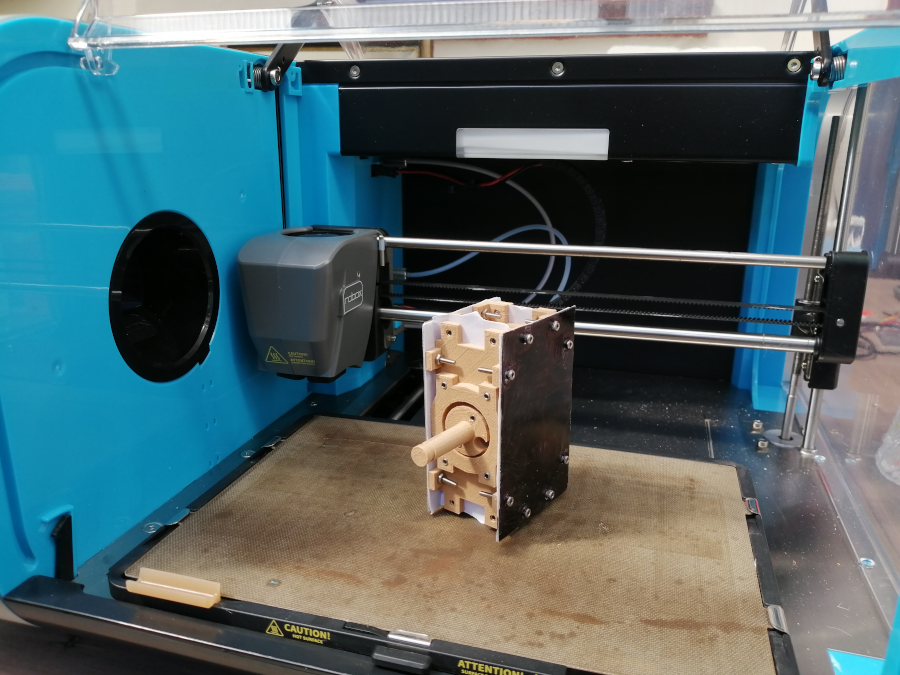
I used Tinkercad which is an online 3D drawing program, which exports
the designs for 3D printing.
I had actually started this project many many years ago, and this engine has been
through countless itterations. But during the start of the lockdown I finally got to a
point
where I think I am close to getting a working design.
After finishing the designs I printed the parts out on my 3D printer (a CELRobox) and
put it together. Although it works mechanically speaking, it doesn't run under the
temperature differences as desired. I think this is down to various factors, the most
important one being the size difference of the power piston and the displacement piston.
So I will have to go back and redesign, and reprint.
I have classified this project as top-secret, I don't think there is an engine in the
world that has this configuration. So if you are Sir James Dyson, or an actual engineer,
I would love to
hear from you and finally get this engine made properly, and out making the lives of
other people better.
Outro
Final thoughts
I hope you have enjoyed these projects. It is quite a lot for 8 weeks, but it has kept
me on the straight and narrow, and thoroughly entertained.
I am now looking forward to the day when we go back to work, so that I can have a rest
from all this!